Tuesday, December 31, 2013

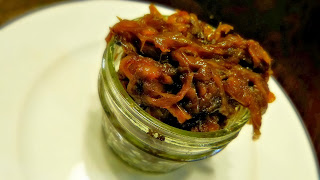
My Cooking Attempts: Caramelized Onions

In my previous post, David's Favorite Burger, I used homemade caramelized onions as a burger topping and promised to share my recipe. I have tried various methods of making these delicious onions, slow cooker, stove top, butter, oil, honey, sugar, balsamic, etc. and so far this is my favorite recipe for the deeply rich flavor of caramelized onions. The trick is not rushing the process and mixing during the perfect time. You want to allow them to brown before you mix, but mix before they burn. Don't worry it isn't as hard as it sounds. Try it, you will see.

Recipe
5 large sweet onions
Note: Any onion will do, however, the sweet onions, as least in my humble opinion, caramelize better and have a deeper flavor. I have used other types of onions with great success. So use whatcha' got at home.
3 tsp EVOO
3 tsp butter
Salt, to taste
1 tsp sugar (optional)
2 tbsp Balsamic vinegar
Water or chicken broth, as necessary

Slice all five onions. Does that sound daunting and a little teary to you? Don't worry, it's not too hard if you follow these instructions:
Trim the stem end of the onion.

Slice in half. Pull skin back, but don't remove.
Slice by making angled cuts into the onion. Don't slice all the way through to the root, this will allow the onion to stay together. Try to slice them on the thinner side.


Chop off the root end. Voilá all done!

Heat a large cast iron skillet, medium high heat.
Note: You can use a stainless steel pan as well. I would recommend staying away from nonstick skillets because they tend to impede the caramelization process.
Add butter and EVOO to skillet. When the butter has melted, add the onions. Stir to coat with butter and oil. Lightly salt.
The onions will cook down in stages. First they will reduce in volume and become translucent.

Then they will begin to brown. This is when you want to stop yourself from over mixing. If you move the onions around too often it will take longer to properly caramelize. Remember we want them to brown, without burning.
At this point you should probably lower the heat to medium low. If you notice the onions are burning then it might be a good idea to add a little water or chicken broth, about 2 tablespoons at a time, as needed.

Once they are all browned you will notice their volume has reduced to more than half their original size. At this point add the balsamic vinegar and sugar, if using. I used just one teaspoon of sugar. You can add more if you'd like. I didn't think that I needed more with these sweet onions. In regards to the vinegar, any balsamic vinegar will do. I used a sweet date balsamic vinegar I bought from Vom Fass. OMG that stuff is delicious!


Continue cooking the onions for about another 15 minutes. The whole process takes about one hour. Wanna know when they are done? They will have a deep drown color, your house will smell delicious, and you won't be able to stop "tasting" them.


It takes a little time, but these onions are oh so worth it. Use immediately or refrigerate in an airtight container for future use on burger, soups, pizza, basically anything you set your mind to! They will seriously elevate any meal.
What's your favorite way to enjoy caramelized onions?


Sunday, December 22, 2013

My Cooking Attempts: David's Favorite Burger

This burger creation came about one weekend when my hubby and I were too lazy to leave the house, yet were craving a delicious burger. My husband wanted "a crunch" to his burger and he didn't want to use a traditional burger bun (which was good because we didn't have any at home). After staring at our fridge and cupboard contents for a while the idea for what is now David's favorite burger was born. We decided to use soft pillowy french bread with a crunchy, fried hash brown, along with a spicy dressing, and a turkey patty. It is OMG delicious! Try and it and tell me what you think.

Recipe
Hash Brown
2 medium red potatoes (or sub with favorite potato)
2-3 tbsp freshly grated Parmesan cheese
Salt and pepper
Vegetable oil

Burger patty
1 16oz package ground turkey
2 tbsp A1 steak sauce
Salt and pepper
Vegetable oil

Spicy Dressing
3 tbsp mayonnaise
2 1/2 tsp Sriracha chili
Seasoning salt to taste

Burger Add-Ons
Loaf of store bought French bread
4 slices of sharp cheddar cheese
1 Roma tomato (or any variety you prefer)
1 head of lettuce, leaves seperated and washed
Caramelized onions (recipe to follow in another post)
pickles for side

Start with your hash browns. I used red potatoes, however, you can use Russet as well. Wash your potatoes. Grate. Rinse off and then soak them in cold water. I usually soak them for at least 2 hours, however, up to 8 hours is good. Change out the water every few hours.
Whenever you are frying potatoes it's a good idea to soak them in order to remove the starch. This will allow them to fry up crispier.


I will begin working on the other burger ingredients 1.5 hours into soaking the potatoes.
Meanwhile the potatoes finish soaking prepare your spicy dressing. Mix all three ingredients (mayo, Sriracha, and seasoning salt) in a small bowl. Set aside. Slice your cheese and tomatoes. Rinse your lettuce and allow to dry. Gather your caramelized (recipe coming soon) or freshly sliced onions and pickles.


Now prepare your turkey patties. Add the ground turkey into a large bowl. Add your A1 sauce, a little salt and pepper. Mix, but don't over mix! Form patties. I usually end up with four, but your number will depend on how large you make your patties.


At this point I usually start the second part of my hash brown process. (1st- Grating and soaking. 2nd- Drying. Third- Mixing and cooking.)

Now, soaking the potatoes is one thing, a great thing, but it is pointless unless you SQUEEZE out all the water. I've seen people use a ricer (without pushing the potatoes through) to thoroughly remove all the water. However, I just use paper towels to ring out all the water. You will need to repeat this process a few times before all the water is removed. I then place the grated potatoes on a dry paper towel, top with another paper towel, and pat dry some more.


I know it's a lot of effort, but it's worth it!
Place the dry grated potatoes in a bowl, season with a little salt and pepper, add grated Parm. Mix. Fry them in hot, shallow pan with about 3-4 tbsp of oil.

I tend to make individual hash browns, while David likes to make one giant hash brown and then slice it up. Do whatever you prefer. Obviously cooking time will vary, based on the size of you hash brown. When one side is crispy, flip and brown the other side. Remove from hot pan and place on a plate lined with a paper towel.


Using the same pan, add a little oil to your pan (if necessary), just to avoid sticking. Add meat.


Cook about 6 minutes on one side. Flip. Add cheese and cook another 6 minutes on the other side. When cooked through, remove from pan and allow to rest for a few minutes.

Meanwhile, slice and toast your French bread. Slather with sauce. Add toppings and hash brown. Top off with your turkey patty. It's a monster burger!


Doesn't that make you hungry? Nom, nom, nom!

Monday, December 16, 2013

My Cooking Attempts: Thai Quinoa

I truly believe in eating healthy. I don't eat healthy to be skinny, TRUST me that ain't gonna happen. I eat healthy to feel good about what's going into my body.  I also believe in delicious food. When people think of eating healthy their minds usually go to bland, boiled chicken breast and flavorless steamed veggies. I think healthy food can and should be flavorful. If done right, healthy food tastes scrumpdillyicious! This Thai quinoa recipe (a play on Pad Thai) most definitely fills those requirements: healthy and delicious.
For those of you who have yet to get on the quinoa bandwagon here's a quinoa infomercial for you:
Quinoa is one of the world's healthiest foods. I've read that if you're going to get stranded on a deserted island, quinoa is the grain you want to be stranded with. Quinoa is a protein and fiber rich, complex carbohydrate that contains iron, antioxidants, B-vitamins and so much more. It's oh so versatile, you can use it in sweet or savory recipes, and it's easy to work with. Just take a look a this recipe:

Quinoa
1 cup of uncooked quinoa
2 1/4 cups of unsalted chicken broth (you can use water as well)
3/4 tsp salt

Veggies and more
1 1/2 cups shredded carrots
1 1/2 cups snow peas or sugar snap peas
1 cup sprouts
1 red bell pepper
1 garlic clove
Coconut oil

Shrimp
1 lb uncooked shrimp
2 tsp Ground ginger
2 tsp Powdered garlic
Salt and pepper
Coconut oil

Dressing
1/4 cup soy sauce
3 tbsp sweet chili sauce
2 tbsp rice wine vinegar
3 tbsp coconut milk
2 tsp Srircha
1 tbsp honey
2 tbsp peanut butter
1 garlic clove
1 lime
2 tsp grated ginger


Toppings
Sliced or slivered almonds
1/2 bunch fresh cilantro
1/2 bunch green onion

Start off with the quinoa.

Measure your quinoa and place it in a fine mesh strainer. Rinse with cold water until the water runs clear.

Although most quinoa is pre-washed it's always a good idea to rinse it off.
Add chicken broth, salt (if broth is unsalted), and rinsed quinoa in a small pot or saucepan, bring to a boil. Lower heat to a low simmer, cover, and allow quinoa to cook as water evaporates. Usually around 15 minutes. Turn off heat and allow to sit for 5 minutes. Remove the lid and fluff the quinoa gently with a fork. Set aside.


Prepare your dressing. Add all dressing ingredients to your food processor or blender.


Blend until smooth. Set aside.

Prepare you veggies. Shred your carrots. Rinse the sugar snap peas and sprouts. Julienne your bell pepper. Dice your garlic.


Add a little coconut oil to a pan, medium high heat. Add garlic, stir. Add all other veggies. Cook 3-4 minutes, until veggies are crisp, yet tender. Remove from heat.


Transfer cooked quinoa to a large bowl and mix with cooked veggies. Mix in dressing, incorporate well. Set aside.

Heat pan to medium high heat, add a teaspoon or so of coconut oil. Season shrimp with salt, pepper, and ground ginger. Add shrimp to warmed pan. As soon as they start to turn a little pink and curl, turn to the other side. Cook for another 30 seconds to one minute.


Remove from heat. Do not overcook!

Roughly chop the cilantro, thinly slice the green onion. Now just put it all together. Add about 1 cup (or whatever you consider a normal serving size) of the quinoa/ veggie mix to a bowl. Top with shrimp and a dash green onion, cilantro, and slivered almonds. FYI I forgot to add the cilantro and green onion, but it was delicious anyways! Enjoy!


Note: The protein in pretty flexible, instead of shrimp I have also used chicken or salmon. Quinoa is so healthy you could even skip the protein and enjoy as is. The salad can be eaten warm or cold.
David's only feedback: Slice the sugar snap peas or snow peas into smaller bite-sized portions. I will keep that in mind for next time!

Monday, December 9, 2013

My Cooking Attempts: Abuela's Creamy Pea Soup

I often get lost in the multitude of recipes found in cookbooks or Pinterest. I want to cook everything & try every recipe out there. I'm always challenging myself & trying new recipes, cooking methods, or ingredients.  & then, when I don't know what to make for dinner or am short on time, I always go back to my old favorites. Those recipes my mom or Abuela taught me. The recipes I make without measuring. The recipes I make when I don't want to think too much. The recipes I know will always turn out delicious. This is one of those recipes.
This creamy pea soup is a dinner staple in my Abuela's house. Although I grew up eating this soup I wasn't too interested in making it until I got married. In an effort to impress my husband, who's mom is a notoriously good cook, I asked my Abuela how to make her famous creamy pea soup. This is how our conversation went:
              Abuela: "You will need butter, green onion, frozen peas, tomato
                             sauce, & half & half."
              Me: "How much do I need?"
              Abuela: "I don't know. How much do you want to make?"
              Me: "Enough for David & I."
              Abuela: "Well then enough ingredients for two servings."
I was seriously lost, I had no idea what to do or where to start. I'd never made anything, besides a salad, without measuring. But that's how she cooks, with her senses, by tasting & smelling food. My abuela rarely measures ingredients. *Which is also why she a HORRIBLE baker. Just don't tell her I told you that!*
So I went for it & winged it. I bought the ingredients & used my senses to cook up a wonderful pot of creamy pea soup. Thankfully it was a success! That could have gone in a completely different direction.
Since then I've adapted the recipe to my liking, just don't tell my abuela! Although I've never measured the ingredients, this past weekend I took the time to measure out everything in order to share the recipe with you. I hope you enjoy!

Creamy Pea Soup
1 1/2 tbsp butter
1/2 bunch of green onion, chopped
1 garlic clove, minced
1 can (8 ounce) tomato sauce
1 lb of frozen or fresh peas
1 1/2 cups chicken stock
1 cup half & half
1 tsp ground nutmeg
Salt & pepper to taste

Boil water. When the water is boiling add the fresh or frozen peas. Bring back to a boil, cook 2-3 minutes. Remove from heat. Drain water and transfer the peas to your blender. Add chicken stock to blender. (As an alternative you can use the water you cook the peas in.) Blend until smooth.

Meanwhile melt the butter in a soup pot, over medium heat. Add chopped green onion & garlic. Saute 2-3 minutes.


Add the can of tomato sauce and cook out the tin flavor, 4-5 minutes.


Add pureed peas. Follow with half & half.

Season to with nutmeg & salt and pepper. Serve with crusty, buttered bread.


Want to know the best part? Not only is it yummy, comforting, & delicious, it's also easy & inexpensive. The perfect combination!

Note: This recipe is wonderfully versatile. You can sub out the peas for almost any vegetable. I've made this exact recipe with carrots, corn, and broccoli. No matter the vegetable, the soup always turns out deliciously creamy & smooth. You can also add more or less half and half, depending on how creamy you prefer your soup. Bon appetit!

Thursday, December 5, 2013

My Cooking Attempts: Roasted Tomato Basil Soup

You know how some people love tomato soup? I'm not one of those. Well, at least I didn't think I was one of those people until I tried this recipe by Two Peas & Their Pod. All of a sudden I understood what all the fuss what about!
I had only ever tried the Campbell's Soup version of tomato soup and, no offense Campbell, but that stuff is HORRIBLE! However, after reading about all the wonderful health benefits of tomatoes I decided to give it another go. Only this time I decided to make the soup myself. I was hoping there would be an immense improvement in the homemade version and I was right. OMG what a difference fresh ingredients and a little TLC make!
I love this soup because, like most of my other recipes, I can make it in large quantities, with minimal effort, and it's healthy and delicious. I've adjusted a few things, here and there, to the recipe, but not much. Honestly, Two Peas & Their Pod hit the nail on the head with this one.

Recipe
3 lbs Roma tomatoes
Note: You can use other types of tomatoes. Just remember, the smaller the tomato the sweeter the tomato. So in this case, smaller is better!
5 cloves of garlic
EVOO
1 medium onion
Dash of red pepper flakes
1 1/2 cup freshly chopped basil 
1 (15 ounce) can diced tomatoes
3 1/2 cups chicken broth
Salt and pepper

First things first. Preheat your oven to 400 degrees. As it heats up rinse your tomatoes and quarter them (cut them in half and then half the halves). Spread the tomatoes on a baking dish or casserole dish. Add the whole garlic cloves. Drizzle with about 2 -3 tablespoons of EVOO. Season with salt and pepper and roast for about 45 minutes.


Relax a little as they roast. When they have finished roasting, remove from oven and set aside.

Now go ahead and start on the second part of the recipe. Gather your next set of ingredients.

Roughly chop your onion and basil. In a large pot, heat the about 2 tablespoons of EVOO over medium heat. Add the onion and cook until tender, about 3 minutes. Stir in the red pepper flakes. Add the canned tomatoes, fresh basil, and chicken broth. Cook for about 10 minutes. Stir in the oven roasted garlic and tomatoes. 

If you have an immersion blender, more power to you! Puree the soup in the stockpot. An immersion blender is still on my "list of things to buy for the kitchen." Until then I use my good ol' blender. 
If using a blender, transfer soup to your blender and blend. Careful, it will be hot. 


Return to pot. Season with salt and pepper.


Cook for about 40 minutes over medium-low heat. This will help meld the flavors together, remove any tin flavor from the canned tomatoes, and reduce some of the liquid, which is crucial since this soup uses no cream.
It's now ready to eat! Serve a large bowl with a side of warm and gooey grilled cheese (recipe to follow in another post) and enjoy.