Sunday, November 24, 2013

My Cooking Attempts: Champurrado, According to David

I love champurrado! What is champurrado you ask? Champurrado is a warm, thick Mexican drink, prepared with masa (corn flour), chocolate, and cinnamon. Champurrado is traditionally served in the morning for breakfast or as a late afternoon snack. However, I am an equal opportunity champurrado consumer; anytime is a good time for champurrado!
Now I must be honest, this is not my recipe. It never even occurred to me that I could or should make champurrado. That all changed when I got married. See in my husband's world homemade champurrado is a normal winter staple, his mom would make it all the time. When we got married he saw no reason to stop the family tradition. Now when I crave champurrado I bat my eyes and beg my husband to make me some. It always works!
This recipe is based off the recipe my mother-in-law verbally gave my husband. It's one of those recipes that comes with a loose list of ingredients and absolutely no measurements. It's taken a couple of tries but we finally discovered the perfect proportion of ingredients to make a delicious cup of champurrado! 


Here is my husband's recipe for champurrado:
Recipe
3 bars of Mexican Chocolate (I recommend Abuelita)
2 1/2 cups of masa harina (corn flour)
11 1/2 cups whole milk
2 cups water
6 cinnamon sticks
1 cup brown sugar
2 tbsp vanilla extract
1 tbsp instant coffee granules
1 tbsp cocoa powder

First things first, gather your first set of ingredients:

Place your cinnamon sticks in a pot, add 2 cups of water, and bring to a boil. Once it's boiling, turn off the heat and allow to steep for about 5 minutes. Drain and set aside.


Add your milk to a large pot. Heat on low.


Meanwhile, you will need to toast your masa. It helps bring out the flavors and adds depth to the champurrado. Add 1 cup of masa into a pan on medium heat. Toast. You will see the color turn to a more golden hue. As you can see below:


When the color turns golden, remove and place in a second bowl. Toast another cup of masa. Again, once it's toasted remove and place in a bowl. Finish toasting the last 1/2 cup of masa.

Next we want to blend the masa into our liquids until it completely dissolves.
Add 2 cups of warm milk + about 1/3 cup of the cinnamon liquid to your blender. Turn blender on and SLOWLY add 1/2 cup of masa.


Blend until the masa has been fully incorporated into the milk. Strain your milk/masa mixture through a fine mesh strainer into a second pot. We want to prevent any lumps of masa in the champurrado. Continue blending and straining until you have fully mixed the milk and the masa. A little milk and cinnamon liquid may remain, just add directly to the blended mixture.

Now it's time to flavor the masa with all the delicious flavors of Mexico!
Since Mexican chocolate comes in discs I like to add half a disc at a time. We want to avoid having the chocolate float to the bottom of the pot and burn. So I add half a disc of chocolate at a time and mix until it completely dissolves. Continue until all the chocolate has been added and dissolved.


Note: Mexican chocolate is chocolate with sugar and other flavorings. It's OMG delicious! If you cannot find  it in your local supermarket it can be substituted with one ounce of semisweet chocolate, ½ teaspoon ground cinnamon and 1 drop almond extract per 1 ounce Mexican chocolate. This recipe uses 9-10 ounces in this recipe.

Next we add the brown sugar and vanilla. Mix well.

Then comes David's little twist to the recipe. Coffee and cocoa powder. Add one at a time, fully incorporating one before moving on to the next. Allow the flavors to meld together, stirring frequently, for about 10 minutes.

Guess what? You have now made champurrado! Now serve yourself a cup, curl up on the couch, and relax. At least that's what I do while enjoying a warm cup of champurrado.


Saturday, November 16, 2013

My Cooking Attempts: Pumpkin Spiced Latte Bread

Okay, so I hate to admit it but I am one of "those people." You know the type, the people who go pumpkin crazy in the Fall. Yup, I'm one of those. Even in California's version of Autumn we pumpkin people get super excited because technically it's pumpkin season. Even in 90 degree weather we'll order a pumpkin spiced latte (PSL), hot please, from Starbucks just because we can. We all go a little crazy baking and cooking pumpkin themed meals and desserts. It is the way of the pumpkin... 
Good thing my husband, family, and friends love pumpkin as much as I do! 
Here is my latest obsession, PSL turned dessert: PSL bread! 

Doesn't it look divine and Autumny? Yum, yum, yum!

Recipe
2 1/2 cups all purpose flour
2 tsp ground cinnamon
1 tsp ground ginger
1 tsp ground nutmeg
1/2 tsp ground cloves
1/2 tsp salt
1 1/2 tsp baking powder
3/4 tsp baking soda
1 cup unsalted butter, room temp
1 1/2 cups sugar
2 tsp vanilla extract2 tbsp instant coffee
2 large eggs, room temp
1/3 cup yogurt (I used Greek yogurt but any other type will be okay)
2 cups pumpkin puree (not canned pumpkin pie)

Ganache
12 ounces chocolate, chopped into small pieces 
* You can use chocolate chips!
1 cup heavy cream
optional 3 tablespoons freshly brewed coffee


Preheat your oven to 350 degrees.

Gather all you dry ingredients.
I forgot to photograph the salt! Just don't forget to add it to the bowl and all will be well! Whisk the dry ingredients (flour, cinnamon, ginger, nutmeg, cloves, salt, baking powder, and baking soda) together in a small bowl. Set aside.

In a large bowl add butter and sugar. Beat together on medium speed until light and fluffy (3-5 minutes).

Now incorporate, one at a time, the vanilla, coffee, and eggs.

In a separate bowl mix together the canned pumpkin and yogurt.

Mix in 1/4 of the dry ingredients into the egg/ sugar mixture. Once its incorporated add 1/4 of the pumpkin/ yogurt mixture. Continue alternating between the two until both have been fully incorporated.

Now I've made this PSL bread multiple ways: bundt cake, loaf, stacked cakes, even muffins. I just adjust the cooking time accordingly. Today I've decided to make it as a loaf (9"x5" loaf pan).
Prep loaf pan by spraying with non-stick. Add batter to prepared pan.
Bake for 1 hour and 20 minutes in the middle rack of the oven. Sometimes it's necessary to add a little extra time, so keep an eye on the bread and adjust accordingly. Although baking is an exact science, ovens often vary.

While the bread bakes prepare the ganache. I love ganache! Honestly I'm not the biggest frosting fan, it tends to be cloyingly sweet and overwhelming. Ganache is always a good substitution. 
The first time I attempted a ganache I didn't realize it's usually meant to be more of a glaze, rather than a frosting. I blame the recipe because they identified it a frosting yet didn't provide instructions for cooling it so it would firm up. It was delicious, but oh so runny, and I thought I had made a mistake somewhere in the recipe. After talking to a baking enthusiast co-worker I understood a ganache is meant to be soft and runny, though it can be made firm. I'm now a convert. I love to use a good ganache in place of the regular powdered sugar frosting. 
In this recipe it's the perfect topping to this PSL bread. You can skip it if you'd like, but it's dark chocolate love and why would anyone want to skip that? Why, I ask you???? 
Place chocolate pieces or chips in a large bowl. Heat heavy cream over medium high heat until it comes to a boil. Remove from heat and immediately pour cream over chocolate. 

Slowly stir until completely mixed and glossy. Add coffee, if using. Personally, I skipped the coffee this time around. The PSL bread has plenty of coffee flavor on it's own.
Note: You can also substitute flavored liqueur for the coffee.

Allow ganache to cool before pouring over bread. The longer you allow the ganache to cool, the thicker it will set. When you like the consistency (I usually wait until it's thick but pourable) pour over bread.

Doesn't it look purrty?
Have a slice and enjoy with a cup of coffee!


Friday, November 8, 2013

My Cooking Attempts: Spaghetti Squash Spaghetti

Time and budget constraints are often cited as reasons for not cooking healthy meals. Sadly, it is not unusual to find your supermarket receipts slowly climb as you try to eat healthier. Just compare the cost of water to that of soda. The other day I took my niece to the movies and we bought some snacks and a small water bottle. I was blown away when I saw the receipt. Can you believe that a small water bottle costs more than a large soft drink? Seriously, there is something wrong with the world when water costs more than soda. Anyways, I digress...
Even when the higher cost of food is not a problem, prep time often is. Cooking a healthy meal can be more involved, however, it doesn't have to be. Take for example spaghetti squash. Spaghetti squash is easy to work with, budget friendly, and yummy on your taste buds. When time allows I go all out with my spaghetti squash dinners. however, when I'm short on time I use the K.I.S.S (keep it simple, stupid) method. I simply roast the squash and top it with spaghetti sauce and a little Parmesan cheese. And voilĂ , dinner is ready!


Ingredients
1 spaghetti squash, medium sized
EVOO
Salt
Pepper
1 jar of your favorite pasta sauce
Parmigiano-Reggiano to taste

Short ingredient list and lots of hands off time, so basically this recipe is the what you'd call easy peasy lemon squeezy!  This is what I buy when I go to the store:

See what I’m saying? Easy peasy lemon squeezy!

Preheat your oven to 400 degrees.

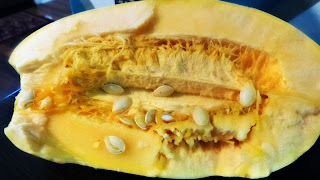
First comes the hardest part *ton, ton, ton* cutting your spaghetti squash in half. The larger the spaghetti squash the harder it is to split. Quite honestly I sometimes take the easy route and ask my husband to cut it for me!
Today I had to fend for myself, as you can tell from those ragged spaghetti squash edges. Ugly cuts won't matter in the end, so just do your best and forget the rest.
Use a spoon to remove the seeds and center strings. Rub with EVOO and season aggressively with salt and pepper.

Place the squash, cut side down on a cookie sheet and bake for 40 minutes.  
Note: If you bought a larger or smaller squash you will need to adjust the roasting time accordingly. Add or subtract 10 minutes, depending on the size of your squash.
Now do whatcha like. Wash a load, take a nap, watch a little Netflix, spend the next 40 minutes or so doing something besides cooking. I did promise it would be easy, didn't I?

40 minutes later, remove from oven. 
Note: Not sure if your spaghetti squash is ready? It should be soft. Using a fork, scrape at the flesh of the squash. If it comes off easily, in threadlike strings, it's ready.

Meanwhile it cools a little, heat your spaghetti sauce and grate your cheese. Once the squash has cooled enough to touch, use a fork to lightly scrape the flesh of the squash into a bowl. Now simply plate your squash and top with sauce and grated parm.


How easy was that? It's tasty, healthy, budget friendly, and has lots of downtime. Oh and my niece loves it, so it's kid friendly too. Yum, yum, yum!
In later posts I will show you some of the other recipes I've put together using spaghetti squash. Stay tuned!


Sunday, November 3, 2013

My Cooking Attempts: Tacos de Tilapia with Chipotle Slaw

Not only is tilapia super easy to work with, but it's budget friendly, has low mercury, and is, generally, eco-friendly. I tend to buy a large bag of individually wrapped frozen tilapia and throw it in the freezer. Then, when I need something fast and easy to make for dinner, I'm prepared like a freakin' Boy Scout! Since it's a beautiful warm day, although we are officially in Fall, I decided to make some fresh tilapia tacos for dinner.
I like my tilapia marinated in tequila and, more often than not, I will play "one shot for the fish, one shot for Danielle." Play it, it's fun!!!

Marinade
4-6 tilapia fillets
1/4 cup tequila
1 lime, zest and juice
1 tablespoon honey or agave
Salt and pepper

Slaw
1 bag (14 ounces) cole slaw mix
   Note: Use the classic mix, with green and red cabbage and + carrots. You can always buy the veggies individually and slice them yourself. I don't do that because the remaining cabbage just wastes away in my fridge.
1 bunch of green onion
1/2 a red onion (or less, if you aren't a big onion fan)
1/2 cup mayonnaise
1/2 cup Greek yogurt
2 limes
2 tablespoons of honey
1 can (7 ounces) chipotle chiles in adobo sauce
Salt and pepper

More
1 avocado
Corn or flour tortillas.

Ready? Let's go make some tacos!

Doesn't it look like I'm making an alcoholic drink????
Zest the lime into a small bowl. Then slice and squeeze the lime juice into the same bowl. Add tequila and whisk in honey or agave. Season with salt and pepper. Place your tilapia in a gallon freezer bag and add marinade. Marinate in the fridge for at least 30 minutes.


While the fish marinates prepare the toppings.... Gather your slaw veggies ingredients: cole slaw mix, red and green onion.


Open bag of cole slaw mix, place in a large bowl. VERY thinly slice the red onion. Thinly slice green onion. Mix with cole slaw.
Now prepare the dressing. Squeeze the juice of the two limes into a bowl. Add Greek yogurt, mayo, and honey. Add 1 tablespoon of the thick red liquid sauce in the can of chipotles and roughly chop two of the chiles from the can. Season with salt and pepper. Whisk all the ingredients together.
Dress the cole slaw, mix until fully incorporated. You want to cover every single piece of cabbage with the delicious dressing! Refrigerate.


Heat pan and spray with nonstick. Remove tilapia form marinade, shake off excess liquid. Place in pan and cook. Don't overcrowd the pan. Cook 2-3 minutes per side.


Slice avocado and set aside. Warm tortillas. I heat my tortillas directly on the gas range. Here are some ways to warm tortillas.
Now put it all together. The fish goes into the tortilla, top with slaw and finish with your sliced avocado.


The fish is fresh and moist, the slaw is sweet and spicy, and the fresh, creamy avocado tops it all off. Add a little hot sauce if you need an extra kick.
Nom, nom, nom!