Saturday, November 16, 2013

My Cooking Attempts: Pumpkin Spiced Latte Bread

Okay, so I hate to admit it but I am one of "those people." You know the type, the people who go pumpkin crazy in the Fall. Yup, I'm one of those. Even in California's version of Autumn we pumpkin people get super excited because technically it's pumpkin season. Even in 90 degree weather we'll order a pumpkin spiced latte (PSL), hot please, from Starbucks just because we can. We all go a little crazy baking and cooking pumpkin themed meals and desserts. It is the way of the pumpkin... 
Good thing my husband, family, and friends love pumpkin as much as I do! 
Here is my latest obsession, PSL turned dessert: PSL bread! 

Doesn't it look divine and Autumny? Yum, yum, yum!

Recipe
2 1/2 cups all purpose flour
2 tsp ground cinnamon
1 tsp ground ginger
1 tsp ground nutmeg
1/2 tsp ground cloves
1/2 tsp salt
1 1/2 tsp baking powder
3/4 tsp baking soda
1 cup unsalted butter, room temp
1 1/2 cups sugar
2 tsp vanilla extract2 tbsp instant coffee
2 large eggs, room temp
1/3 cup yogurt (I used Greek yogurt but any other type will be okay)
2 cups pumpkin puree (not canned pumpkin pie)

Ganache
12 ounces chocolate, chopped into small pieces 
* You can use chocolate chips!
1 cup heavy cream
optional 3 tablespoons freshly brewed coffee


Preheat your oven to 350 degrees.

Gather all you dry ingredients.
I forgot to photograph the salt! Just don't forget to add it to the bowl and all will be well! Whisk the dry ingredients (flour, cinnamon, ginger, nutmeg, cloves, salt, baking powder, and baking soda) together in a small bowl. Set aside.

In a large bowl add butter and sugar. Beat together on medium speed until light and fluffy (3-5 minutes).

Now incorporate, one at a time, the vanilla, coffee, and eggs.

In a separate bowl mix together the canned pumpkin and yogurt.

Mix in 1/4 of the dry ingredients into the egg/ sugar mixture. Once its incorporated add 1/4 of the pumpkin/ yogurt mixture. Continue alternating between the two until both have been fully incorporated.

Now I've made this PSL bread multiple ways: bundt cake, loaf, stacked cakes, even muffins. I just adjust the cooking time accordingly. Today I've decided to make it as a loaf (9"x5" loaf pan).
Prep loaf pan by spraying with non-stick. Add batter to prepared pan.
Bake for 1 hour and 20 minutes in the middle rack of the oven. Sometimes it's necessary to add a little extra time, so keep an eye on the bread and adjust accordingly. Although baking is an exact science, ovens often vary.

While the bread bakes prepare the ganache. I love ganache! Honestly I'm not the biggest frosting fan, it tends to be cloyingly sweet and overwhelming. Ganache is always a good substitution. 
The first time I attempted a ganache I didn't realize it's usually meant to be more of a glaze, rather than a frosting. I blame the recipe because they identified it a frosting yet didn't provide instructions for cooling it so it would firm up. It was delicious, but oh so runny, and I thought I had made a mistake somewhere in the recipe. After talking to a baking enthusiast co-worker I understood a ganache is meant to be soft and runny, though it can be made firm. I'm now a convert. I love to use a good ganache in place of the regular powdered sugar frosting. 
In this recipe it's the perfect topping to this PSL bread. You can skip it if you'd like, but it's dark chocolate love and why would anyone want to skip that? Why, I ask you???? 
Place chocolate pieces or chips in a large bowl. Heat heavy cream over medium high heat until it comes to a boil. Remove from heat and immediately pour cream over chocolate. 

Slowly stir until completely mixed and glossy. Add coffee, if using. Personally, I skipped the coffee this time around. The PSL bread has plenty of coffee flavor on it's own.
Note: You can also substitute flavored liqueur for the coffee.

Allow ganache to cool before pouring over bread. The longer you allow the ganache to cool, the thicker it will set. When you like the consistency (I usually wait until it's thick but pourable) pour over bread.

Doesn't it look purrty?
Have a slice and enjoy with a cup of coffee!


Friday, November 8, 2013

My Cooking Attempts: Spaghetti Squash Spaghetti

Time and budget constraints are often cited as reasons for not cooking healthy meals. Sadly, it is not unusual to find your supermarket receipts slowly climb as you try to eat healthier. Just compare the cost of water to that of soda. The other day I took my niece to the movies and we bought some snacks and a small water bottle. I was blown away when I saw the receipt. Can you believe that a small water bottle costs more than a large soft drink? Seriously, there is something wrong with the world when water costs more than soda. Anyways, I digress...
Even when the higher cost of food is not a problem, prep time often is. Cooking a healthy meal can be more involved, however, it doesn't have to be. Take for example spaghetti squash. Spaghetti squash is easy to work with, budget friendly, and yummy on your taste buds. When time allows I go all out with my spaghetti squash dinners. however, when I'm short on time I use the K.I.S.S (keep it simple, stupid) method. I simply roast the squash and top it with spaghetti sauce and a little Parmesan cheese. And voilĂ , dinner is ready!


Ingredients
1 spaghetti squash, medium sized
EVOO
Salt
Pepper
1 jar of your favorite pasta sauce
Parmigiano-Reggiano to taste

Short ingredient list and lots of hands off time, so basically this recipe is the what you'd call easy peasy lemon squeezy!  This is what I buy when I go to the store:

See what I’m saying? Easy peasy lemon squeezy!

Preheat your oven to 400 degrees.

First comes the hardest part *ton, ton, ton* cutting your spaghetti squash in half. The larger the spaghetti squash the harder it is to split. Quite honestly I sometimes take the easy route and ask my husband to cut it for me!
Today I had to fend for myself, as you can tell from those ragged spaghetti squash edges. Ugly cuts won't matter in the end, so just do your best and forget the rest.
Use a spoon to remove the seeds and center strings. Rub with EVOO and season aggressively with salt and pepper.

Place the squash, cut side down on a cookie sheet and bake for 40 minutes.  
Note: If you bought a larger or smaller squash you will need to adjust the roasting time accordingly. Add or subtract 10 minutes, depending on the size of your squash.
Now do whatcha like. Wash a load, take a nap, watch a little Netflix, spend the next 40 minutes or so doing something besides cooking. I did promise it would be easy, didn't I?

40 minutes later, remove from oven. 
Note: Not sure if your spaghetti squash is ready? It should be soft. Using a fork, scrape at the flesh of the squash. If it comes off easily, in threadlike strings, it's ready.

Meanwhile it cools a little, heat your spaghetti sauce and grate your cheese. Once the squash has cooled enough to touch, use a fork to lightly scrape the flesh of the squash into a bowl. Now simply plate your squash and top with sauce and grated parm.


How easy was that? It's tasty, healthy, budget friendly, and has lots of downtime. Oh and my niece loves it, so it's kid friendly too. Yum, yum, yum!
In later posts I will show you some of the other recipes I've put together using spaghetti squash. Stay tuned!


Sunday, November 3, 2013

My Cooking Attempts: Tacos de Tilapia with Chipotle Slaw

Not only is tilapia super easy to work with, but it's budget friendly, has low mercury, and is, generally, eco-friendly. I tend to buy a large bag of individually wrapped frozen tilapia and throw it in the freezer. Then, when I need something fast and easy to make for dinner, I'm prepared like a freakin' Boy Scout! Since it's a beautiful warm day, although we are officially in Fall, I decided to make some fresh tilapia tacos for dinner.
I like my tilapia marinated in tequila and, more often than not, I will play "one shot for the fish, one shot for Danielle." Play it, it's fun!!!

Marinade
4-6 tilapia fillets
1/4 cup tequila
1 lime, zest and juice
1 tablespoon honey or agave
Salt and pepper

Slaw
1 bag (14 ounces) cole slaw mix
   Note: Use the classic mix, with green and red cabbage and + carrots. You can always buy the veggies individually and slice them yourself. I don't do that because the remaining cabbage just wastes away in my fridge.
1 bunch of green onion
1/2 a red onion (or less, if you aren't a big onion fan)
1/2 cup mayonnaise
1/2 cup Greek yogurt
2 limes
2 tablespoons of honey
1 can (7 ounces) chipotle chiles in adobo sauce
Salt and pepper

More
1 avocado
Corn or flour tortillas.

Ready? Let's go make some tacos!

Doesn't it look like I'm making an alcoholic drink????
Zest the lime into a small bowl. Then slice and squeeze the lime juice into the same bowl. Add tequila and whisk in honey or agave. Season with salt and pepper. Place your tilapia in a gallon freezer bag and add marinade. Marinate in the fridge for at least 30 minutes.


While the fish marinates prepare the toppings.... Gather your slaw veggies ingredients: cole slaw mix, red and green onion.


Open bag of cole slaw mix, place in a large bowl. VERY thinly slice the red onion. Thinly slice green onion. Mix with cole slaw.
Now prepare the dressing. Squeeze the juice of the two limes into a bowl. Add Greek yogurt, mayo, and honey. Add 1 tablespoon of the thick red liquid sauce in the can of chipotles and roughly chop two of the chiles from the can. Season with salt and pepper. Whisk all the ingredients together.
Dress the cole slaw, mix until fully incorporated. You want to cover every single piece of cabbage with the delicious dressing! Refrigerate.


Heat pan and spray with nonstick. Remove tilapia form marinade, shake off excess liquid. Place in pan and cook. Don't overcrowd the pan. Cook 2-3 minutes per side.


Slice avocado and set aside. Warm tortillas. I heat my tortillas directly on the gas range. Here are some ways to warm tortillas.
Now put it all together. The fish goes into the tortilla, top with slaw and finish with your sliced avocado.


The fish is fresh and moist, the slaw is sweet and spicy, and the fresh, creamy avocado tops it all off. Add a little hot sauce if you need an extra kick.
Nom, nom, nom!


Friday, October 25, 2013

My Cooking Attempts: Sopa de AlbĂłndigas

I grew up eating warm bowls of albĂłndigas for dinner. I would so look forward to the cold weather because I knew my mom would soon be making albĂłndigas.


Funnily I never knew albĂłndigas meant meatballs. I just thought that was the name of the soup, like menudo or pozole. However, albĂłndigas specifically refers to the meatballs, not necessarily the soup. Weird, right? Once I asked a friend for her albĂłndiga recipe and she gave me the recipe for meatballs and nothing more. When I asked her for the rest of the recipe she said "Oh, you mean sopa de albĂłndigas?" Confused? Yeah, so was I! Don't despair! If you say I'm eating albĂłndigas most people (my friend excluded) will understand you mean the soup. Just in case you're still confused, this recipe is for meatball soup, not just meatballs!

Meatballs
1/2 lb ground pork
1/2 lb ground beef
1 egg
2 green onion
1/2 bunch mint
1/4 cup rice
1/2 tomato
1 tsp garlic powder
2 tsp salt
1 tsp pepper

Soup
1/2 brown onion
1 tomato
7 cups water
2 cups chicken broth
2 carrots
2 cups of diced potatoes
1 zucchini
2 celery stalks
Salt to taste

Start with the rice: Rinse the rice and soak for 30 minutes. Just enough time to prepare your other ingredients.

Dice your brown onion and tomato. Add a little oil to a soup pot, medium heat. Add onion and tomato. Cook down for a few minutes.
Add water and chicken broth. Season with salt. Bring to a boil.

Meanwhile prepare your meatballs:

Finely dice the green onion and mint. Seed the tomato and finely dice.
Note: If the dice is too large the meatballs will fall apart. So, although it may seem like a bother, finely dice the veggies! It's an important step.
Drain the water from the rice. Add the veggies into a large mixing bowl with the rice, ground pork and beef, egg, and seasonings. Mix all the ingredients together, don't over mix. Form into balls.


I tend for smaller meatballs. They cook more evenly and are less likely to fall apart. Also, they don't feel overwhelming in your soup bowl. I don't want you to experience this:

LOL

Once the water is boiling, lower to medium heat and gently drop the meatballs into the broth. Allow to simmer about 30 minutes.

Meanwhile prep your other veggies:


Peel and evenly slice your carrots into bite-sized rounds. I don't peel my potato, but feel free to. Chop the potato, zucchini, and celery into even, bite-size pieces.


Once the meatballs have cooked for about 30 minutes add the veggies. First add the potatoes and carrots. Allow to cook about 10 minutes. Next add the celery and zucchini. Allow to simmer about 15 minutes. Taste for seasoning, adjust accordingly.
It makes a big ol' pot of soup!


Serve!


My mom always serves our sopa de albĂłndigas with a side of slightly charred corn tortillas and some Tapatio. I skip the tortillas and enjoy as is.


Wednesday, October 16, 2013

My Cooking Attempts: Arroz con leche

Believe it or not I didn't grow up eating arroz con leche. Despite my family's Mexican roots it wasn't a sweet treat in our home. By that I don't mean I rarely had it, I mean I never even tasted it until reaching adulthood. I wasn't able to luxuriate in the cinnamony aroma of sweet arroz con leche until I got married and my mother-in-law made it for my husband.
When I asked my mother-in-law for the recipe I experienced an Everybody Loves Raymond moment. You know the episode, when Marie gives Deborah the wrong ingredients so when Deb attempts the meatball recipe her meatballs don't taste as good as Marie's! When I attempted the recipe my mother-in-law gave me I ended up and a gooey, horrible mess! I wonder if that was a coincidence????
As I am no "giver-uper" I went about searching and adapting recipes until I found and prefected a delicious and oh so easy arroz con leche recipe. Pay close attention, I promise not to lead you astray!

Recipe
2 cups long grain rice
2 whole cinnamon sticks
4 + 1/4 cups water
1 can condensed milk, 14 ounces
1 can coconut milk, 13.5 ounces
    Note: Make sure it's the canned, cooking coconut milk not the carton drinking coconut milk)
1 can evaporated milk, 12 ounces
1 cup whole milk + more if you like your arroz con leche a little looser
    Note: I tend use whatever I have on hand, usually almond milk
1 tbsp vanilla extract or vanilla bean paste
1/2 cup raisins (optional)
Ground cinnamon, for dusting

Rinse the rice, to remove any dust and foreign debris. Set aside. Add water to a pot, add cinnamon sticks, and bring to a boil.


When the water comes to a boil, add the rice. Lower to medium low heat, cover, and cook until most, but not all, the water has evaporated. Turn off the heat. DO NOT REMOVE THE LID. The steam will complete the cooking process.


When all the water has evaporated remove the cinnamon sticks (otherwise you will end up with pieces of cinnamon bark whenever you take a bite). Add all four milks (condensed, evaporated, coconut, and, in this case, almond milk).


Turn the heat back on, low. Mix regularly or it will stick to the bottom of the pot. Add vanilla and raisins, if using. Allow flavors to meld. Cook for about 15 minutes. Serve in a bowl. Dust with ground cinnamon and enjoy.


Arroz con leche can be enjoyed hot or cold. I like it both ways, but David loves it hot. Oh and I never add raisins to my arroz con leche, that's a strict David rule! However, feel free to add them, as it is a traditional addition to arroz con leche.

Note: If you microwave any leftovers make sure to add a dash of milk so that it doesn't dry out. If you are not a big coconut fan and you're thinking of skipping this recipe, give it a try. The coconut flavor is so mild you don't even notice it. However, you can substitute the coconut milk with whole milk if you really can't stand the idea of tasting coconut in your arroz con leche.

Friday, October 11, 2013

My Cooking Attempts: Vanilla Chai Cupcakes

I have three favorite cold weather drinks: 1) green tea latte, 2) vanilla chai tea latte, and 3) champurrado. Today we are going to talk about chai tea lattes!

I love cradling a hot latte in both hands while curled up on my couch. I love the smell of the spicy chai tea & the sweetness of the vanilla. 
Chai tea is one of the only reasons I put up with cold weather. Well, that & being able to bake without dying from heat exhaustion, boots, & sleeping in on rainy mornings. In honor of my reason to wake up on cold mornings I've decided to replicate my favorite vanilla chai tea latte in cupcake form. Because then I get two of my favorite cold weather things, a chai tea latte & baking, in one little cupcake.

Recipe
3 cups all purpose flour
2 1/2 tsp baking powder
1 tsp salt
1 cup butter (2 sticks), room temperature
1 cup white sugar
1 cup brown sugar, light or dark
4 eggs, room temperature
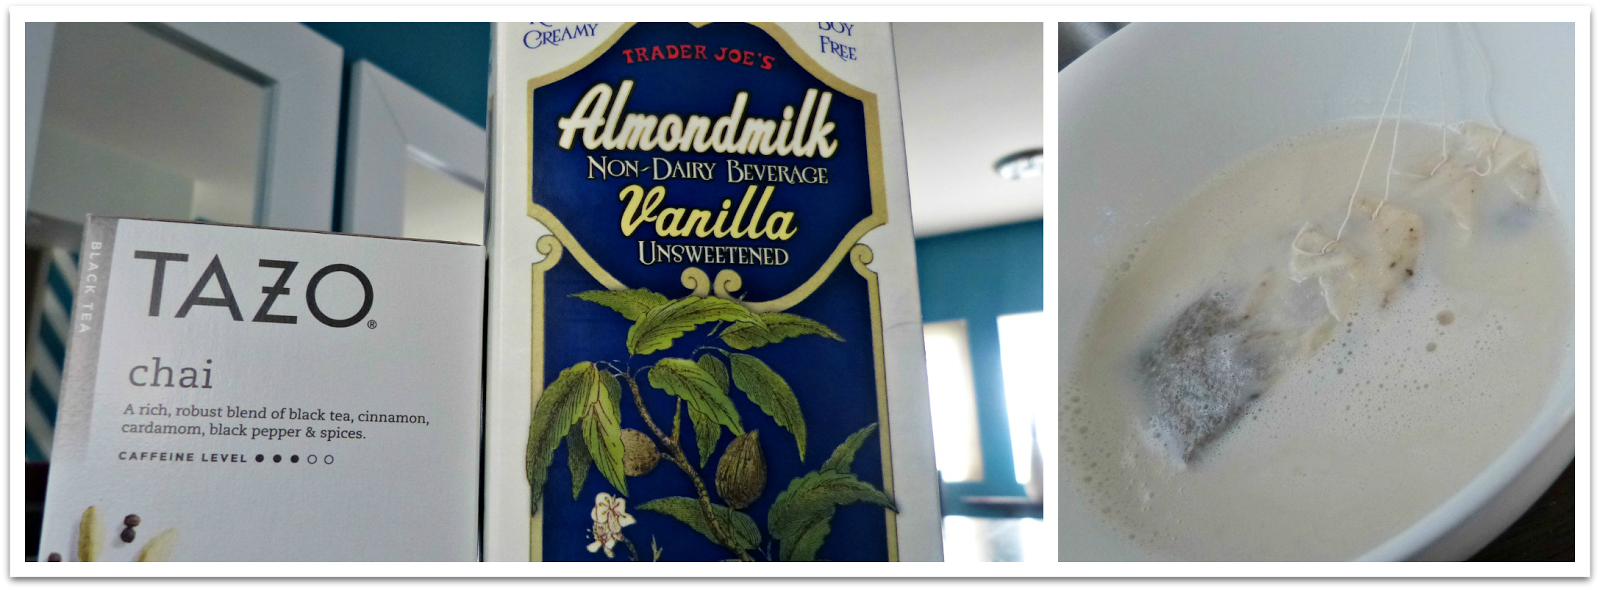
1 cup milk (I used vanilla almond milk)
4 chai teabags
1 tsp vanilla bean paste
2 tsp vanilla extract
2 tsp cinnamon
1 tsp cardamom
1 tsp ginger
1 tsp nutmeg
1 tsp cloves

I know it may seem like a lot of spices, but they really make a difference, so don't skip any! I think its the perfect blend & depth of spices. You won't loose the taste of the spices in the sweet cupcake, yet I promise you won't feel overwhelmed by them either. Trust me, if my 6 year old nephew ate & enjoyed one, without frosting, then you will too!

Preheat oven 350 degrees.
Bring milk to a light boil. Steep teabags in milk for about 10 minutes. Allow to cool.

Meanwhile sift together the flour, baking powder, salt, & spices (cloves, nutmeg, ginger, cardamom, & cinnamon).


Cream your butter with both sugars until light and fluffy. Add eggs, one at a time, & vanilla extract & paste. 


Mix in half the dry ingredients. Don't over mix. Add half the chai infused milk, blend to incorporate. Repeat with the remaining dry ingredients and milk. 


Fill in your cupcake liners 3/4 of the way up. Bake 15-18 minutes. 
Allow to cool slightly and transfer to cooling rack.

Meanwhile whip up some frosting. I opted for a stabilized vanilla whipped cream with a dusting of ground cinnamon to top it off. I figured I'd go for a literal interpretation of a latte topped with whipped cream.

Recipe
1/2 tsp unflavored gelatin powder 
2 tbsp cold water
1 cup heavy whipping cream
3 tbsp confecctioners sugar
1 tsp vanilla extract or 1/2 tsp vanilla paste
pinch of salt


In a bowl sprinkle gelatin over cold water. Scald 2 tablespoons of whipping cream & pour over gelatin. Stir until dissolved.
Refrigerate about 15 minutes. Then whisk until smooth.
*Warning: Don't let it sit for more then 15 minutes otherwise you will end up with lumps. And trust me they a'int no lovely lady lumps ;)*
Once it's smooth mix in the remaining cream. Slowly incorporate sugar, salt, & vanilla. Mix until smooth, stopping to scrape the bowl as necessary.

Frost cupcakes and sprinkle with a dusting of ground cinnamon. Now inhale. Literally take a whiff of that baby, it smells delicious. Now taste it. Wasn't it worth all those spices? I sure think so!


Saturday, October 5, 2013

My Cooking Attempts: Turkey Lettuce Wraps

I wasn't always obsessed with cooking and trying new recipes. I mean I've always enjoyed cooking, but in the past 5 years I've come to really appreciate trying new recipes, ingredients, and foods. I blame this partly on the Food Network and partly on this recipe for turkey lettuce wraps.
A few years ago I tried, and was truly impressed, with P.F. Chang's chicken lettuce wraps. I liked them so much I scoured the internet for a good copycat recipe. It was a while before I found a recipe I liked. I then took that recipe and began to experiment with it.  I played with it until I found what, in my opinion, is the best combination and measurement of ingredients. 
Since then I've become slightly obsessed with taking recipes and modifying them to my own personal taste. Here is my take on turkey lettuce wraps. Please keep in mind it has been years since I've been to P.F. Chang's, so although this recipe began as a copy cat recipe, it's now become my own creation.

Recipe
  • 1 cup carrots, diced
  • 2 celery stocks, diced
  • 1/2 cup water
  • 1 cup of sugar snap peas
  • (20 ounce) package ground turkey 
  • Note: When I want a higher meat to vegetable ration I've been known to use as much as 2 lbs of ground turkey with this exact recipe. The results are just as wonderful, if a little more meaty. So feel free to adjust to your preference.
  • 8 ounces chopped mushrooms
  • (8 ounce) cans water chestnuts, drained and sliced
  • garlic cloves, minced 
  • 2 tablespoons fresh ginger, minced. 
  • 1/3 cup teriyaki sauce
  • 2 tablespoons peanut butter 
  • 1 tablespoon sesame oil
  • 1 tablespoon of soy sauce
  • 1 tablespoon rice vinegar
  • 1/4 cup hoisin sauce
  • 1/2 cup sliced green onions 
  • head butter or iceberg lettuce
  • Toppings
  • Hoisin sauce
  • Slivered almonds or crispy chow mein noodles

  • Dice celery and carrots. Cook with 1/2 cup water in a large nonstick skillet over medium high heat, stirring until the veggies soften and the water has evaporated. Remove from skillet and set aside. 


  • Meanwhile, boil a pot of water. When water is boiling add the sugar snap peas. Cook for 2-3 minutes. Blanche in ice cold water so they stop cooking and retain their color and "snap."


  • Heat pot. Yes, I said pot. Trust me, if you use anything smaller you will run out of room! Spray with nonstick spray (I find turkey sticks very easily).  Medium heat, add turkey. You could add a little EVOO, if you find your turkey is sticking more than you'd like. Stir periodically as it cooks. 


  • Meanwhile prepare your other veggies. Chop your mushrooms and water chestnuts. I buy sliced water chestnuts. They cost the same as whole water chestnuts and it saves a little time and effort. I don't take the time to dice them any smaller, though I can see where one might argue for a smaller dice. I LOVE water chestnuts so it doesn't bother me to get a big ol' piece when I bite into my lettuce wrap. Slice or dice with prejudice! ;)

  • Slice the sugar snap peas diagonally, into thirds. Mince your garlic and ginger. 

  • When the turkey crumbles and is no longer pink add the garlic and ginger. Allow to cook for a few minutes. Next add the veggies (carrots, celery, mushrooms, water chestnuts, and sugar snap peas). Mix to incorporate. 


Now add all the flavorings: Teriyaki sauce, peanut butter, sesame oil, rice vinegar, soy sauce, and hoisin sauce. Mix well. 


  • Cook to incorporate the flavors, 4-5 minutes should do it. Fold in the green onions. Remove them heat.  
  • You are now ready to serve. Spoon mixture onto lettuce leaves. Any lettuce will do, however I prefer the way butter lettuce looks and the way iceberg lettuce tastes. I usually use one of those two options.
  • Dip or top with a squirt of hoisin sauce and slivered almonds or crispy chow mein noodles


  • Note: If you use the almonds be sure to toast them for a more developed flavor. Heat a dry pan to medium heat. Add almonds, spread evenly.  Shake pan frequently, to prevent burning. It won't take long, 3-5 minutes. Remove from heat and place in a bowl. 

  • You are now ready to eat!

  • I love this recipe. When I don't know what to make for dinner or what to take to a potluck this is my go to recipe. It easy, delicious, and makes a beautiful presentation. Hopefully, once you've tried the recipe, you will feel the same and add it to your list of "go-to" dinner recipes. 
  • Note: In the past I have also added bamboo shoots and bean sprouts to the mix. Add them if you'd like.