Wednesday, October 16, 2013

My Cooking Attempts: Arroz con leche

Believe it or not I didn't grow up eating arroz con leche. Despite my family's Mexican roots it wasn't a sweet treat in our home. By that I don't mean I rarely had it, I mean I never even tasted it until reaching adulthood. I wasn't able to luxuriate in the cinnamony aroma of sweet arroz con leche until I got married and my mother-in-law made it for my husband.
When I asked my mother-in-law for the recipe I experienced an Everybody Loves Raymond moment. You know the episode, when Marie gives Deborah the wrong ingredients so when Deb attempts the meatball recipe her meatballs don't taste as good as Marie's! When I attempted the recipe my mother-in-law gave me I ended up and a gooey, horrible mess! I wonder if that was a coincidence????
As I am no "giver-uper" I went about searching and adapting recipes until I found and prefected a delicious and oh so easy arroz con leche recipe. Pay close attention, I promise not to lead you astray!

Recipe
2 cups long grain rice
2 whole cinnamon sticks
4 + 1/4 cups water
1 can condensed milk, 14 ounces
1 can coconut milk, 13.5 ounces
    Note: Make sure it's the canned, cooking coconut milk not the carton drinking coconut milk)
1 can evaporated milk, 12 ounces
1 cup whole milk + more if you like your arroz con leche a little looser
    Note: I tend use whatever I have on hand, usually almond milk
1 tbsp vanilla extract or vanilla bean paste
1/2 cup raisins (optional)
Ground cinnamon, for dusting

Rinse the rice, to remove any dust and foreign debris. Set aside. Add water to a pot, add cinnamon sticks, and bring to a boil.


When the water comes to a boil, add the rice. Lower to medium low heat, cover, and cook until most, but not all, the water has evaporated. Turn off the heat. DO NOT REMOVE THE LID. The steam will complete the cooking process.


When all the water has evaporated remove the cinnamon sticks (otherwise you will end up with pieces of cinnamon bark whenever you take a bite). Add all four milks (condensed, evaporated, coconut, and, in this case, almond milk).


Turn the heat back on, low. Mix regularly or it will stick to the bottom of the pot. Add vanilla and raisins, if using. Allow flavors to meld. Cook for about 15 minutes. Serve in a bowl. Dust with ground cinnamon and enjoy.


Arroz con leche can be enjoyed hot or cold. I like it both ways, but David loves it hot. Oh and I never add raisins to my arroz con leche, that's a strict David rule! However, feel free to add them, as it is a traditional addition to arroz con leche.

Note: If you microwave any leftovers make sure to add a dash of milk so that it doesn't dry out. If you are not a big coconut fan and you're thinking of skipping this recipe, give it a try. The coconut flavor is so mild you don't even notice it. However, you can substitute the coconut milk with whole milk if you really can't stand the idea of tasting coconut in your arroz con leche.

Friday, October 11, 2013

My Cooking Attempts: Vanilla Chai Cupcakes

I have three favorite cold weather drinks: 1) green tea latte, 2) vanilla chai tea latte, and 3) champurrado. Today we are going to talk about chai tea lattes!

I love cradling a hot latte in both hands while curled up on my couch. I love the smell of the spicy chai tea & the sweetness of the vanilla. 
Chai tea is one of the only reasons I put up with cold weather. Well, that & being able to bake without dying from heat exhaustion, boots, & sleeping in on rainy mornings. In honor of my reason to wake up on cold mornings I've decided to replicate my favorite vanilla chai tea latte in cupcake form. Because then I get two of my favorite cold weather things, a chai tea latte & baking, in one little cupcake.

Recipe
3 cups all purpose flour
2 1/2 tsp baking powder
1 tsp salt
1 cup butter (2 sticks), room temperature
1 cup white sugar
1 cup brown sugar, light or dark
4 eggs, room temperature
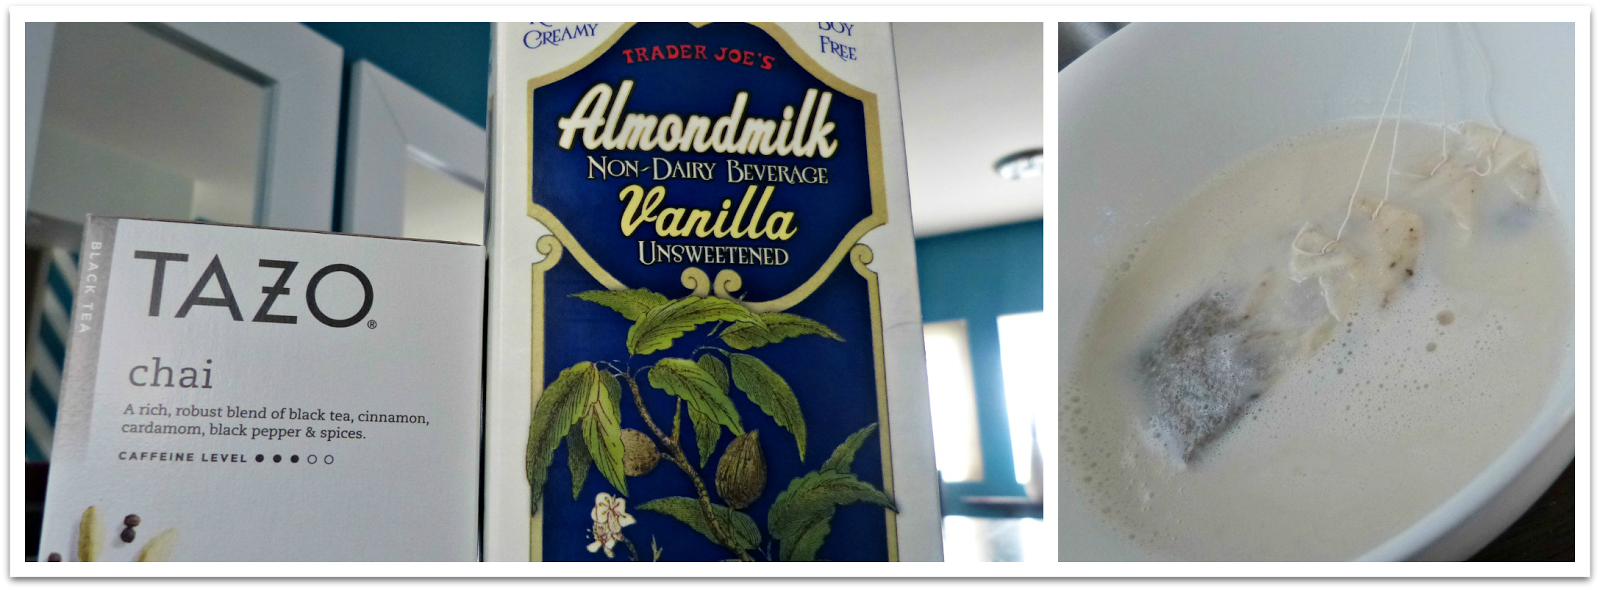
1 cup milk (I used vanilla almond milk)
4 chai teabags
1 tsp vanilla bean paste
2 tsp vanilla extract
2 tsp cinnamon
1 tsp cardamom
1 tsp ginger
1 tsp nutmeg
1 tsp cloves

I know it may seem like a lot of spices, but they really make a difference, so don't skip any! I think its the perfect blend & depth of spices. You won't loose the taste of the spices in the sweet cupcake, yet I promise you won't feel overwhelmed by them either. Trust me, if my 6 year old nephew ate & enjoyed one, without frosting, then you will too!

Preheat oven 350 degrees.
Bring milk to a light boil. Steep teabags in milk for about 10 minutes. Allow to cool.

Meanwhile sift together the flour, baking powder, salt, & spices (cloves, nutmeg, ginger, cardamom, & cinnamon).


Cream your butter with both sugars until light and fluffy. Add eggs, one at a time, & vanilla extract & paste. 


Mix in half the dry ingredients. Don't over mix. Add half the chai infused milk, blend to incorporate. Repeat with the remaining dry ingredients and milk. 


Fill in your cupcake liners 3/4 of the way up. Bake 15-18 minutes. 
Allow to cool slightly and transfer to cooling rack.

Meanwhile whip up some frosting. I opted for a stabilized vanilla whipped cream with a dusting of ground cinnamon to top it off. I figured I'd go for a literal interpretation of a latte topped with whipped cream.

Recipe
1/2 tsp unflavored gelatin powder 
2 tbsp cold water
1 cup heavy whipping cream
3 tbsp confecctioners sugar
1 tsp vanilla extract or 1/2 tsp vanilla paste
pinch of salt


In a bowl sprinkle gelatin over cold water. Scald 2 tablespoons of whipping cream & pour over gelatin. Stir until dissolved.
Refrigerate about 15 minutes. Then whisk until smooth.
*Warning: Don't let it sit for more then 15 minutes otherwise you will end up with lumps. And trust me they a'int no lovely lady lumps ;)*
Once it's smooth mix in the remaining cream. Slowly incorporate sugar, salt, & vanilla. Mix until smooth, stopping to scrape the bowl as necessary.

Frost cupcakes and sprinkle with a dusting of ground cinnamon. Now inhale. Literally take a whiff of that baby, it smells delicious. Now taste it. Wasn't it worth all those spices? I sure think so!


Saturday, October 5, 2013

My Cooking Attempts: Turkey Lettuce Wraps

I wasn't always obsessed with cooking and trying new recipes. I mean I've always enjoyed cooking, but in the past 5 years I've come to really appreciate trying new recipes, ingredients, and foods. I blame this partly on the Food Network and partly on this recipe for turkey lettuce wraps.
A few years ago I tried, and was truly impressed, with P.F. Chang's chicken lettuce wraps. I liked them so much I scoured the internet for a good copycat recipe. It was a while before I found a recipe I liked. I then took that recipe and began to experiment with it.  I played with it until I found what, in my opinion, is the best combination and measurement of ingredients. 
Since then I've become slightly obsessed with taking recipes and modifying them to my own personal taste. Here is my take on turkey lettuce wraps. Please keep in mind it has been years since I've been to P.F. Chang's, so although this recipe began as a copy cat recipe, it's now become my own creation.

Recipe
  • 1 cup carrots, diced
  • 2 celery stocks, diced
  • 1/2 cup water
  • 1 cup of sugar snap peas
  • (20 ounce) package ground turkey 
  • Note: When I want a higher meat to vegetable ration I've been known to use as much as 2 lbs of ground turkey with this exact recipe. The results are just as wonderful, if a little more meaty. So feel free to adjust to your preference.
  • 8 ounces chopped mushrooms
  • (8 ounce) cans water chestnuts, drained and sliced
  • garlic cloves, minced 
  • 2 tablespoons fresh ginger, minced. 
  • 1/3 cup teriyaki sauce
  • 2 tablespoons peanut butter 
  • 1 tablespoon sesame oil
  • 1 tablespoon of soy sauce
  • 1 tablespoon rice vinegar
  • 1/4 cup hoisin sauce
  • 1/2 cup sliced green onions 
  • head butter or iceberg lettuce
  • Toppings
  • Hoisin sauce
  • Slivered almonds or crispy chow mein noodles

  • Dice celery and carrots. Cook with 1/2 cup water in a large nonstick skillet over medium high heat, stirring until the veggies soften and the water has evaporated. Remove from skillet and set aside. 


  • Meanwhile, boil a pot of water. When water is boiling add the sugar snap peas. Cook for 2-3 minutes. Blanche in ice cold water so they stop cooking and retain their color and "snap."


  • Heat pot. Yes, I said pot. Trust me, if you use anything smaller you will run out of room! Spray with nonstick spray (I find turkey sticks very easily).  Medium heat, add turkey. You could add a little EVOO, if you find your turkey is sticking more than you'd like. Stir periodically as it cooks. 


  • Meanwhile prepare your other veggies. Chop your mushrooms and water chestnuts. I buy sliced water chestnuts. They cost the same as whole water chestnuts and it saves a little time and effort. I don't take the time to dice them any smaller, though I can see where one might argue for a smaller dice. I LOVE water chestnuts so it doesn't bother me to get a big ol' piece when I bite into my lettuce wrap. Slice or dice with prejudice! ;)

  • Slice the sugar snap peas diagonally, into thirds. Mince your garlic and ginger. 

  • When the turkey crumbles and is no longer pink add the garlic and ginger. Allow to cook for a few minutes. Next add the veggies (carrots, celery, mushrooms, water chestnuts, and sugar snap peas). Mix to incorporate. 


Now add all the flavorings: Teriyaki sauce, peanut butter, sesame oil, rice vinegar, soy sauce, and hoisin sauce. Mix well. 


  • Cook to incorporate the flavors, 4-5 minutes should do it. Fold in the green onions. Remove them heat.  
  • You are now ready to serve. Spoon mixture onto lettuce leaves. Any lettuce will do, however I prefer the way butter lettuce looks and the way iceberg lettuce tastes. I usually use one of those two options.
  • Dip or top with a squirt of hoisin sauce and slivered almonds or crispy chow mein noodles


  • Note: If you use the almonds be sure to toast them for a more developed flavor. Heat a dry pan to medium heat. Add almonds, spread evenly.  Shake pan frequently, to prevent burning. It won't take long, 3-5 minutes. Remove from heat and place in a bowl. 

  • You are now ready to eat!

  • I love this recipe. When I don't know what to make for dinner or what to take to a potluck this is my go to recipe. It easy, delicious, and makes a beautiful presentation. Hopefully, once you've tried the recipe, you will feel the same and add it to your list of "go-to" dinner recipes. 
  • Note: In the past I have also added bamboo shoots and bean sprouts to the mix. Add them if you'd like. 

Friday, September 27, 2013

My Cooking Attempts: Black Bean and Avocado Brownies

I woke up earlier than usual this morning and I just couldn't go back to sleep. So what did I do? I baked some brownies! I tried a recipe for healthy brownies that I found through Pinterest. The pin originated from Bakeaholic Mama. This gluten free, protein filled, coffee-laced brownie will get you through your chocolate cravings without ruining your diet. Sounds too good to the true, right? I was a little skeptical as well, but I was won over as soon as I added the cocoa powder to the batter!

Recipe
1 15 oz can black beans, drained and rinsed
1/2 avocado
2 eggs
1/4 cup of honey
1/4 cup peanut butter
1/4 cup cocoa powder
1/4 teaspoon salt
1 teaspoon vanilla extract
1/4 cup sugar
1 tablespoon instant coffee

Directions
Preheat oven to 350 degrees.

Gather all your ingredients:


I forgot to photograph the eggs. Poor eggs! Leaving out an ingredient seems to be my M.O.
Note: I highly recommend Pernigotti cocoa powder. It's really made the difference in my chocolate baked goods. Also, I used crunchy peanut butter, since that's what I had on hand. I am sure creamy would be just as delicious, if a little less nutty. If you'd like you can also add a pinch of ground cinnamon (1/2 teaspoon). I did! It doesn't flavor the batter, so much as add an extra layer of "something special" to the brownies.Having tried these brownies before I also new to reduce the instant coffee from 1 tablespoon to 2 teaspoons.

I drained and rinsed the black beans and dropped them into the food processor with half an avocado. Make sure your canned black beans aren't flavored, otherwise your brownies will taste like garlic and onion. Puree until smooth.


Weird combination for brownies, right? Don't worry, it will get worse before it gets better. Hang in there, it will be worth it!
Transfer the pureed mixture from the food processor to a bowl. Mix in the eggs, honey and peanut butter.
Hint: spray a little non-stick into your measuring cup so that the honey and peanut butter slide right out. Otherwise it can get a little messy.

The original recipe did not specify if we should mix by hand or mixer so I used my mixer. This is what the mixture looks like after blending:


I know, not pretty. It has a horrible green/ brown color that looks good on no one and nothing! Add the cocoa powder, salt, vanilla extract, sugar, cinnamon, and coffee. It will immediately transform the batter!


Beat until smooth. Can you tell the difference? The cocoa powder and coffee really brought it to life!


Bakeaholic Mama recommends you transfer the mixture into a 8x8 greased pan and bake for 30-35 minutes, or until a toothpick comes out clean. I decided to bake them as cupcakes or muffins. My goal was portion control! I filled the cupcake molds to the very top and baked them for 18 minutes. Remember every oven is different so your timing may vary. Adjust accordingly.

This is the final product. I saved the brownies for an after dinner surprise and served them with a scoop of my healthy banana ice cream. (I omitted the coffee from the ice cream recipe so I wouldn't have coffee overload with coffee flavored desserts.)


Looks delicious, right? It's cause they are! I couldn't even taste a hint of the avocado or beans. Instead I tasted mocha deliciousness! These healthy brownies are perfect for people who love a strong coffee flavor in their baked goods. If that's not your cup of tea, or in this case coffee, you may consider reducing the amount of coffee. If you are really watching your sugar intake you could probably get away with reducing the amount of sugar as well. Enjoy!

Saturday, September 21, 2013

My Cooking Attempts: Sweet Potato and Halloumi Burgers

After last week's recipe I had plenty of leftover halloumi cheese. I didn't want the cheese to go to waste so I scoured Pinterest for an interesting halloumi cheese recipe. I didn't want to fry or grill the cheese, as I had last week; I wanted to find a different use for the cheese. I found my something different in The Purple Pumpkin blog. Here Michelle makes a sweet potato and halloumi cheese burger. Since David loves sweet potatoes I thought I'd give it a go.

Recipe
  • 450g sweet potatoes, peeled and chopped 
  • 225g halloumi with chilli (or plain halloumi and ½ fresh red chilli, chopped), grated 
  • 1 garlic clove, crushed 
  • 3 spring onions, finely chopped 
  • 2 tbsp wholemeal flour 
  • Olive oil
Notes
I am no mathematician so I used Gourmet Sleuth's gram conversion calculator to make sense of the gram measurements  The halloumi cheese was easy, since the package was measured in grams. Based on the conversion calculator I figured 450 grams of sweet potato is just about 3 1/2 cups.
Also, for the wholemeal flour I used whole wheat flour and I subbed out the spring onions for green onions. I also added red pepper flakes and paprika to the mixture.

Steps
Peel, chop, and boil your sweet potatoes. Try to cut them into roughly the same size, so they cook at the same time. 

Meanwhile grate the cheese, crush your garlic, chop your green onions. 
Once the sweet potatoes are fork tender drain and mash. I didn't go too crazy with the mash, I wanted to leave a little texture for a heartier patty.

.

Please forgive me pot, clearly it's seen better days! As long as it works I will continue using it!

Once the mashed sweet potatoes have cooled a little, add the cheese, garlic and onions. FYI my halloumi did not have chile, so I added red pepper flakes and a pinch of smoked paprika to the mix. It will look something like this:


Form into patties. Cover and chill in the fridge so they meld and hold their shape while cooking. 


Cook them with a little olive oil. They can come apart as you cook them, so be careful. You can bake them in the oven, but I don't think they will get the same sear and crunch. If you'd like to bake them preheat your oven to 400 degrees and bake for about 10-15 minutes. 

I ate my sweet potato and halloumi cheese burger wrapped in lettuce. I was inspired by In-N-Out's animal style, protein style burger. I added pickles for crunch and a little mayo mixture for an extra layer of flavor. I just mix a spoonful of mayo with a few drops of Sriracha and a little seasoning salt.


Verdict: The sweet potato and halloumi cheese patty was a little soft, the texture will not leave you thinking "humm I wonder if this is a meat patty," but it is super delicious. David and I both loved the burgers. Next time I will probably form and fry them as cheesy, sweet potato tater tots. I think the soft texture might be better in that format. 


Saturday, September 14, 2013

My Cooking Attempts: Halloumi Taco

I’m a Pinterest addict. There, I’ve said it. They say the first step is admitting you have a problem. *Stretches, shakes off the old* Ahhh, that felt good. Now that I have that out of the way I can move on to the wonderful recipe I found on Pinterest! Pinterest is one of my favorite places to discover new foods and recipes. If you haven't tried it yet you should sign-up for an account today! See how I did that ;) *Muahahahahahaha*

A few weeks ago I stumbled across this pin. The pin originated from The Design Files Daily’s Tasty Tuesday Sandwich Club by Matt Wilkinson of Pope John.
Matt's recipe introduced me to a few new ingredients:
  • Halloumi cheese- A Cypriot gourmet cheese made from a mix of sheep's and goat's milk. It has a higher melting point than other cheese which makes it a WONDERFUL cheese for grilling and frying. OMG!!! When I discovered this I was immediately hooked! Plain halloumi is firm, salty and a bit rubbery; think thick feta. It has an odd texture uncooked, I wouldn't recommend to eat it this way. Cooked, the saltiness fades into a strong savory bite, with a slightly creamy texture. Now that's the stuff! Yummy!!!
  • Dukka- An Egyptian side dish consisting of a mixture of herbs, nuts, usually hazelnut, and spices. It is typically used as a dip with bread or fresh vegetables, and eaten as an hors d'Ĺ“uvre.
  • Chilli jam- Um jam and chile? I’d never heard of it, but I was willing to give it a try. I didn't need to research this one, it was pretty straight forward. Jam= sweet. Chile= HOT!
Here’s the original recipe:
  • 2 Barham Avocados (reed variety)
  • 12 slices of halloumi
  • ½ bunch coriander (roots removed, then wash three times and pat dry)
  • 4 tsp Egyptian dukka
  • 4 tbsp Cunliffe & Waters tomato chilli jam
  • 8 slices Phillipa’s bakery wholewheat and honey bread
What I did differently:
  • I used Hass Avocados. 'Cause it hass to be hass! Too corny? Sorry, I just can’t help it sometimes!
  • I used spinach instead of cilantro (what Matt calls coriander). I forgot to pick some up so I worked with what I had on hand. I considered using basil but I worried the flavor would overtake the cheese.
  • Couldn't find Dukka in any store, so I skipped it. If I ever find it I will definitely use it, it may add an extra dimension of flavor to this recipe.
  • I used Tabasco: Spicy Pepper Jelly instead of Cunliffe & Waters tomato chilli jam. Sometimes you gotta work with what you can find at the supermarket. 'Nuff said.
  • Instead of sliced bread I used naan. I liked the idea of eating it like a taco.
Do whatcha' like. Follow the original recipe or follow mine or invent your own recipe. Your taste buds be your guide let.  Yes, hmmm. <(-_-)>

This was a really easy and super delicious meal, I would highly recommend you give it a try.

First I gathered my ingredients. Mise en place and all that jazz:


I then sliced the halloumi and, in a pan with a little oil, fried it.

I had a little help today. Now that's the way to cook, with a handsome man by your side!

While David fried the cheese I smashed the avocados in a bowl. If you don't know how to cut and peel an avocado see this tutorial. Season with salt and pepper. Go easy with the salt because this cheese is really salty. I also heated the naan 'a la tortilla style, straight on the burner of my gas stove. Just watch out when you flip them, they get really hot!

Once the naan is nice and warm I slathered on the smashed avocado, followed by some pepper jelly.


At that point the cheese was ready to go so I layered cheese on one side of the naan, spinach on the other. Taco style.
That's it. It's ready to go into your mouth!
Doesn't it look yummy? If you said yes, then you would be correct. Easy, yummy and totally different.

Lessons Learned
  • Have no food earlier in they day. You want as much room as possible in your tummy when you eat your halloumi sandwich. I could eat the fried cheese on it's own, it's that good. But the other ingredients take it to a whole 'nother level!
  • The pepper jelly wasn't too hot. David actually added Sriracha (what my sister-n-law calls cock sauce, due to the rooster on the bottle). It might be that another brand of chile jam or pepper jelly is spicier, so feel free to branch out a little and adjust accordingly.
  • Next time I will try it with cilantro, I think it might add a nice layer of flavor.
  • I've made this recipe twice and found that some brands of halloumi cheese are firmer than others. Try to use a firmer cheese. It makes the frying process much easier. If it's too soft it will melt away as you fry it. The brand I showed in the pic (Christis) fried really well. Also, don't slice your cheese too thin.
Off to Greece via my halloumi cheese taco. Now that's the way to travel!

Thursday, September 5, 2013

My Cooking Attempts: Mocha Banana Ice Cream

I have a weakness for ice cream. If there's ice cream in the house I'm gonna know about it and I'm gonna eat it! Any type of ice cream will do! I'm no ice cream snob! Gelato, sorbet, frozen yogurt, soft serve, even shave ice, with, of course, a scoop of ice cream underneath. It all tastes good to me! As you can imagine this isn't exactly a healthy habit, so in an effort to combat my icy sweet tooth I've started to make frozen banana ice cream. The taste and texture is very similar to ice cream and it's a much healthier option. What more could a girl ask for?
There are a lot of recipes out there, but with a few modifications I have found the combination that works for me. And because I like you guys I will share it with you!
Recipe
3 large ripe bananas
1 tablespoon peanut butter
1 teaspoon cocoa powder
1/2 teaspoon of vanilla extract
1 teaspoon of instant coffee granules

Select three bananas. Not too ripe, or the banana flavor will overpower the entire ice cream. Not too firm, or it won't blend to a creamy consistency. Channel your inner Goldilocks. Find the bananas that are just right, the median of those two extremes.


Slice your bananas and freeze them for at least 2-3 hours. If you blend them too early you will end up with banana pudding instead of banana ice cream. I tend to freeze them overnight and make ice cream the next day.

Place your frozen bananas in your food processor. Blend them until smooth.


About half way through it will have course crumb texture. Just scrape down the sides and keep on blending.


When you see it come together and take on a creamy texture it's ready for the next set of ingredients. 


Now add the peanut butter, cocoa powder, vanilla extract and coffee.

Blend to mix. That's it, you've just made ice cream.


See how easy that was? And it doesn't even taste like banana. It tastes like mocha heaven!
You can eat it right away, it will just be on the softer side. Or you can freeze it for an hour or so and eat it later. If you freeze it longer than an hour, let it sit out on your counter for a while or it won't be very "scoopable."

This will produce enough for 2-4 servings, depending on what you consider a normal ice cream serving size. Of course you can double, triple, or even quadruple the recipe to your ice cream delight!

Notes
It is really easy to modify this recipe. Increase the peanut butter for a sweeter, creamier mixture. Sweeten with honey or agave instead of peanut butter. Add almond or soy milk to make it creamier. Change the ice cream's flavor by adding different types of fruit, e.g. strawberries, mango, etc. Add nuts for texture.
For what it's worth I've tried strawberries and the water content lead to an icier ice cream. So if you eat it immediately it's good, but if you freeze it and eat it later it's not as creamy.